An official website of the Commonwealth of Massachusetts Here's how you knowHere's how you know

Issuing and Printing EBT Cards at Local Offices
All SNAP benefits and the majority of TAFDC and EAEDC benefits are accessed using Electronic Benefit Transfer (EBT) cards. New and replacement EBT cards may be requested through:
- The DTA Assistance Line IVR system,
- FIS' IVR system (the number listed on the back of the card),
- Visiting a local TAO,
- DTA Connect portal and the DTA Connect app; or
- In writing by mail or fax.
All eligibility and engagement staff and their supervisors along with local office managers are able to issue EBT cards by mail using the Central Print function. This may take several days to reach the client. For faster service, clients may visit a local office to receive an EBT card the same day.
Local Office EBT Card Printing
If a client visits a local office specifically to get an EBT card, they must be registered with reason “EBT” and steps below are to be followed. If a client visits a local office for another reason, such as Applying for Assistance and also needs an EBT card, use that reason when registering and once the application is completed, the client must be reregistered for EBT.
Some clients require a photo on their EBT card. If the client requires a photo on their card, and there is no photo available from DTA or the RMV, a photo must be taken at the Local Office.
Reminder: All clients must be given an EBT brochure when they are first issued a card and all clients are to be provided the Steps to Lock and Unlock Your EBT Card flyer whenever a new or replacement card is issued. If a client is in the TAO to re-pin, and the machine to PIN the EBT card is not operational, give the client the EBT brochure. This brochure contains instructions on how to call and PIN a card remotely. If requested, clients must be assisted to complete the call and PIN their card in the TAO.
To Request an EBT Card
- Search for the client in BEACON and open their Electronic Case Folder (ECF).
- Open the EBT Card Request page
 . This will show the client’s EBT Card issuance history. Reviewing the history can help determine if the card being requested is New or a Replacement.
 - To create a card request, select what type of card the client needs from the Request Type drop down. Available options are:
- New – If this is the client’s first card, or if their case has been closed for 30 days or more.
- Replacement – If the client has an active case. A drop down will activate for “Reason.” Select the option that best matches the reason why the client needs a replacement.
- Re-Pin – For clients who have their card but need a new PIN.
- Credit Replacement Fee – Used when a client is owed a credit for a fee charged for an EBT card replacement, usually due to admin error or a hearings disposition.
- For the Card Type dropdown, select the appropriate option. All options are available for each Request Type. These card types depend on who the card is being printed for and what authorization is on file in BEACON. Available options are:
- Primary – If the card is being issued to the client.
- Authorized Payee – If the card is being issued to an authorized payee.
- Authorized Rep – If the card is being issued to an authorized representative.
- Authorized Rep/Payee - If the card is being issued to an individual who is both the authorized representative and the authorized payee.
- For the Identity dropdown, select the method with which the client’s identity was verified.
- For the Card sub type, select from:
- Photo – Most DTA clients are required to have a photo on their EBT card. BEACON will populate this field if case information does not reflect exception reasons. See Photo EBT Requirements.
- Non-Photo – State law allows for exceptions to the photo rule if some requirements are met, such as age, disability, or domestic violence. BEACON will populate this field if one of the exception requirements are met. See Photo EBT Requirements for more detailed information.
- Emergency - For Emergency Cards. Additional steps are required by authorized users on the EBT Card Details page, as explained below.
- DSNAP – Related to Disaster-SNAP program. See Household Misfortune for more information.
- If the client wants to receive the card in the mail, select Central for print. For a card being issued at a Local Office, select Local.
- Click Save to save the request to the case file.
- If the request is Central, no further action is required.
- If the request is Local, the client must be re-registered for Reason “EBT” and brought to the reception area to meet with the front-end staff issuing EBT cards. See: Registering Clients in BEACON
Issuing an EBT Card Using the Connected Digital Signature Pad
Prior to printing EBT cards, each day staff must place the daily card inventory in the hopper on the right-hand side for storage purposes only. Card Inventory should remain in the hopper throughout the day. View/HideView/Hide
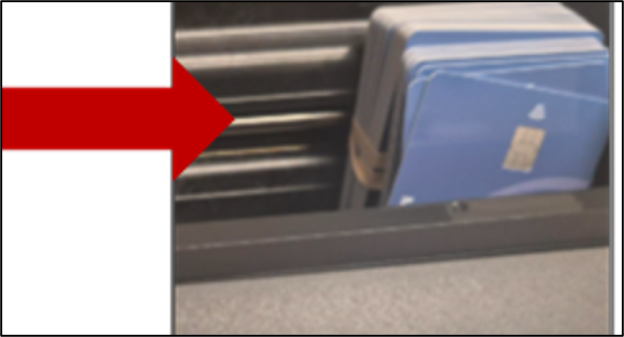
Once a client has had an EBT card requested and they have been re-registered for Reason “EBT,” the front-end staff will meet with the client to review/verify their identity and issue an EBT card. To do this:
- Open the EBT Card Detail window.
- To do this navigate in BEACON to My Office → Views → Daily Priority Actions → Pending EBT Card Request and open the EBT Card Detail window
- Alternatively, you can go to Client Search in the My Office menu and search for the client directly. You can then click the EBT Card Details icon there.
- Once the EBT Card Detail window is opened select the Method of Identification.
- Select the appropriate Brochure option (New/Replacement). View/HideView/Hide
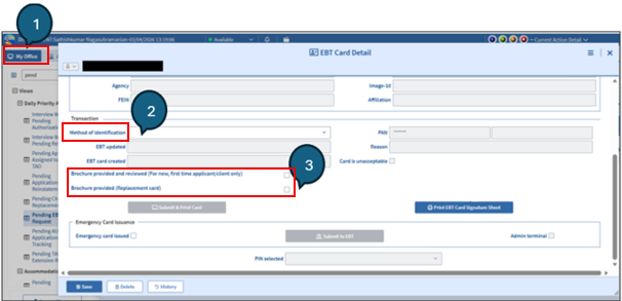
Figure 2: Screenshot of EBT Card Detail Window showing steps 1-3 - Click on the empty space next to PAN shown below. View/HideView/Hide
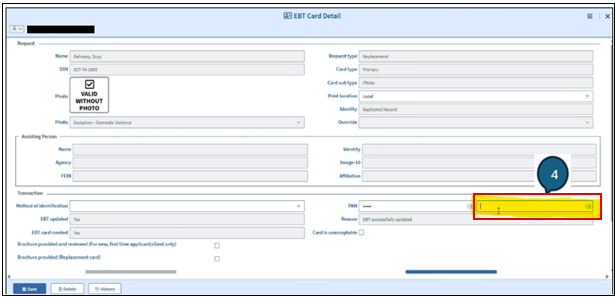
Figure 3: Screenshot of EBT Card Detail Window showing step 4 - Take one card from the hopper and swipe the magstripe on the Magtek card reader provided. The PAN will populate in the highlighted field. Once done, the PAN will be masked, and you will verify the PAN on another step. View/HideView/Hide
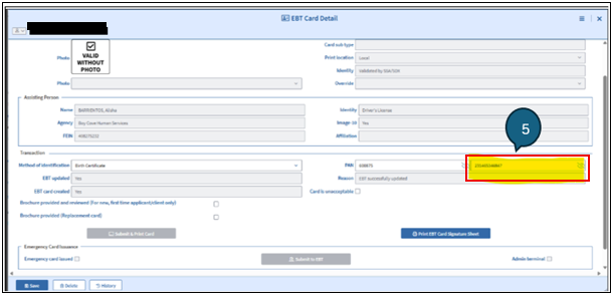
Figure 4: Screenshot of EBT Card Detail Window showing step 5 - Select the Digital Signature button. This will open the Digital Signature window.
- Digital signature button will be enabled only if the signature pad device is connected. View/HideView/Hide
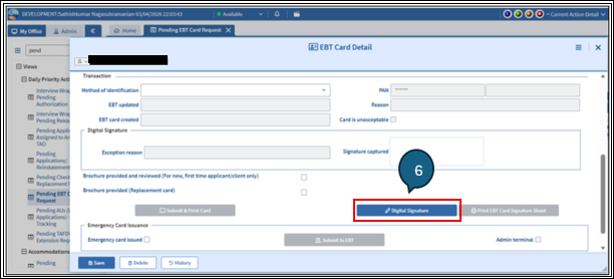
Figure 5: Screenshot of EBT Card Detail Window showing step 6
- Digital signature button will be enabled only if the signature pad device is connected. View/HideView/Hide
- Capture the client’s signature on the device by clicking Sign.
- Clicking sign will prompt the client to sign on the digital device.
- There will be a slight delay as BEACON communicates with the pad.
- Click Save once signature appears on screen.
- This will then enable the Submit & Print card button on the EBT card details window. View/HideView/Hide
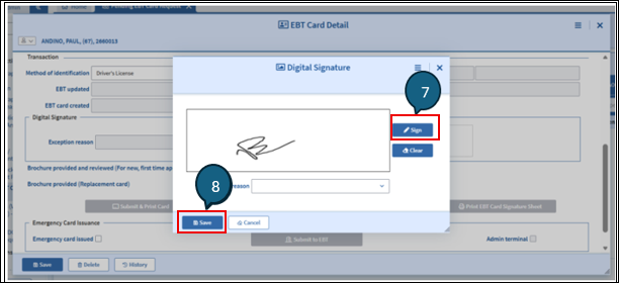
Figure 6: Screenshot of Digital Signature window showing steps 7 and 8
- This will then enable the Submit & Print card button on the EBT card details window. View/HideView/Hide
- Click “Submit and Print Card” on the EBT Card Detail Window. The EBT Card Issuance window will pop up. View/HideView/Hide
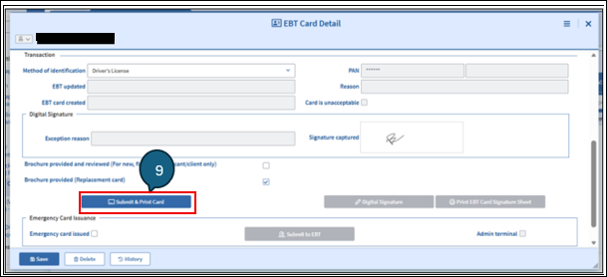
Figure 7: Screenshot of EBT Card Detail Window showing step 9 - Verify that the PAN on the EBT Card Issuance window matches. View/HideView/Hide
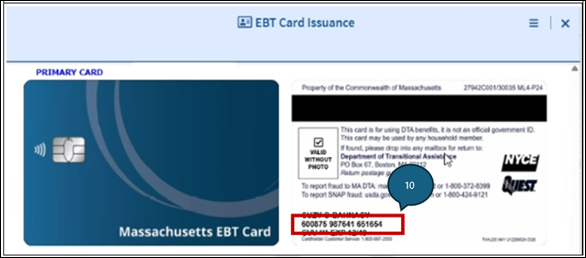
Figure 8: Screenshot of EBT Card Issuance Window showing step 10 - Once PAN is verified you will need to put the card into the far-left side of the card hopper; with the chip and tap symbol facing up, and “Massachusetts EBT” along the bottom facing the hopper as seen below.
- Once loaded you will click “Submit and Print Card” on the EBT Card Issuance Screen. If the PAN does not match what is shown on screen, click cancel and then re-swipe the card. View/HideView/Hide
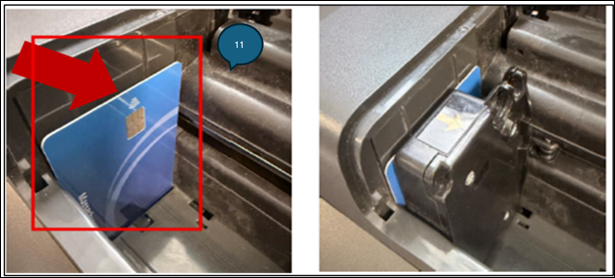
Figure 9: Image of step11 showing how to properly insert card into printer 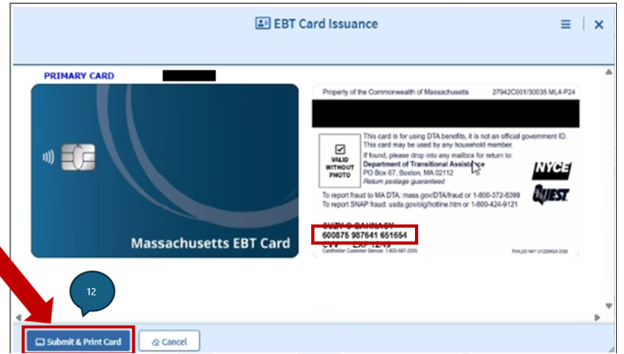
Figure 10: Screenshot of EBT Card Issuance window showing step 12 - Select a value from the “PIN selected” dropdown on the EBT Card Detail Window based on whether the client set a PIN in the office.
- Click Save to complete the process. View/HideView/Hide
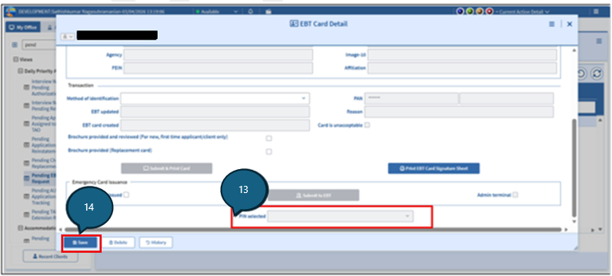
Figure 11: Screenshot of EBT Card Detail Window showing steps 13 and 14 - Beacon will prompt “Was an acceptable card printed”, you must review the card and all details before you click yes.
- If everything is correct; click yes.
- If anything is not correct; click no and repeat issuance steps. View/HideView/Hide
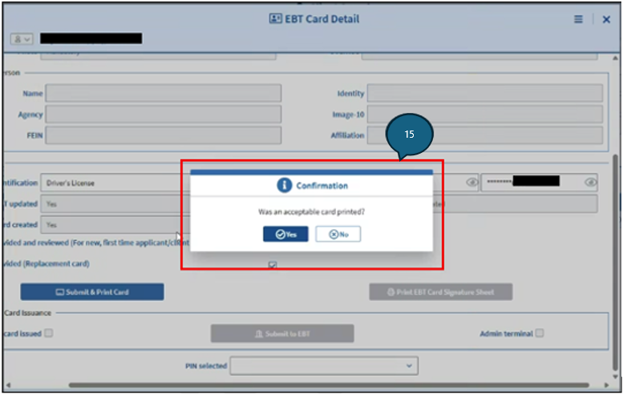
Figure 12: Screenshot of successful print Confirmation pop-up for step 15
- Once the card has been successfully printed, give the client the brochure and their card.
Reminders:
Cards will be fed one at a time through the hopper on the left-hand side.
Always verify that the PAN in Beacon matches the PAN on the card before printing.
If a printing error occurs, follow existing procedures for voided or damaged cards.
If an acceptable card is not printed, you must use a new card when repeating the process (the first card would be voided).
You can now opt to tap the card when pinning for clients. If you do not wish to tap, you can insert the card as swiping will cause an error on the POS device.
Issuing an EBT Card Without the Digital Signature Pad Connected
If the local office does not have a digital signature pad onsite or the pad is disconnected the following procedures must be followed.
Prior to printing EBT cards, each day staff must place the daily card inventory in the hopper on the right-hand side for storage purposes only. Card Inventory should remain in the hopper throughout the day. View/HideView/Hide
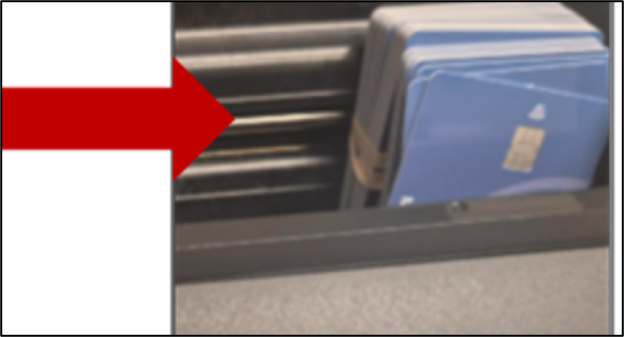
Once a client has had an EBT card requested and they have been re-registered for Reason “EBT,” the front-end staff will meet with the client and issue an EBT card. To do this:
- Open the EBT Card Detail window.
- To do this navigate in BEACON to My Office → Views → Daily Priority Actions → Pending EBT Card Request and open the EBT Card Detail window
- Alternatively, you can go to Client Search in the My Office menu and search for the client directly. You can then click the EBT Card Details icon there.
- Once the EBT Card Detail window is opened select the Method of Identification.
- Select the appropriate Brochure option (New/Replacement). View/HideView/Hide
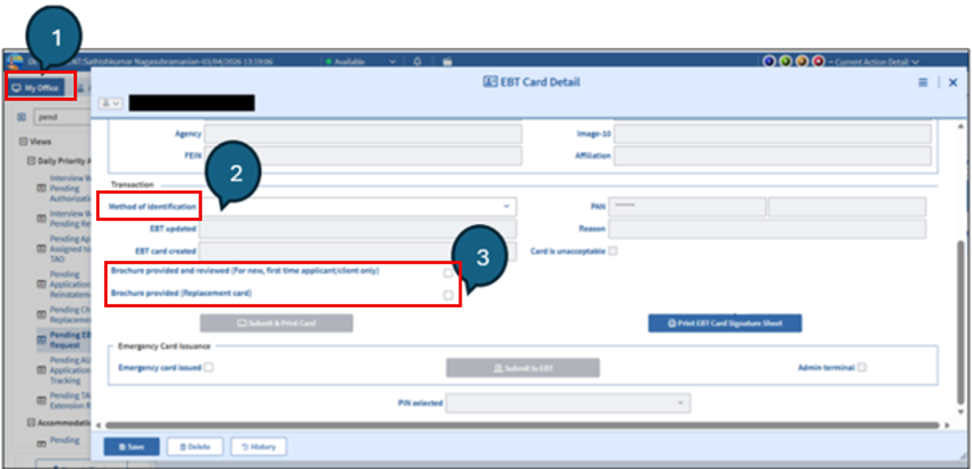
Figure 14: Screenshot of EBT Card Detail window showing steps 1-3 - Click on the empty space next to PAN shown below. View/HideView/Hide
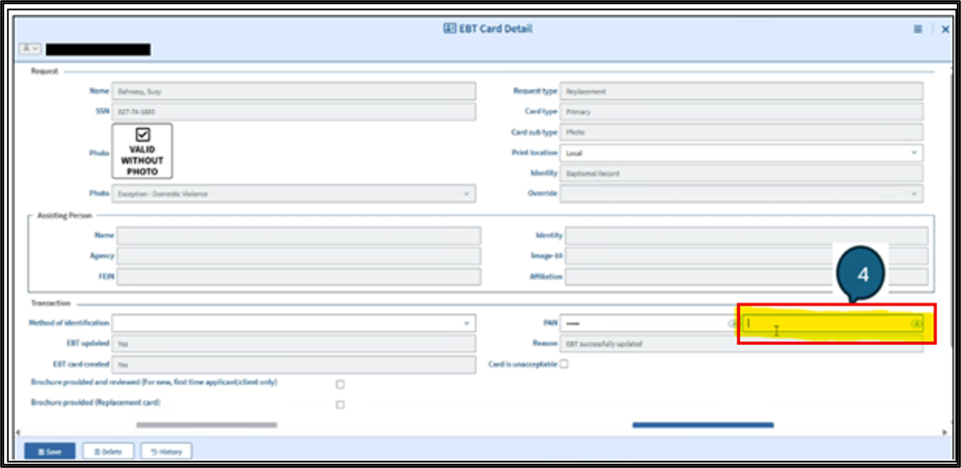
Figure 15: Screenshot of EBT Card Detail window showing step 4 - Take one card from the hopper and swipe the magstripe on the Magtek card reader provided. The PAN will populate in the highlighted field. Once done, the PAN will be masked, and you will verify the PAN on another step.
- Click Print EBT Card Signature Sheet,
- Print the EBT Card Signature Sheet from the Preview window and have the client sign it. View/HideView/Hide
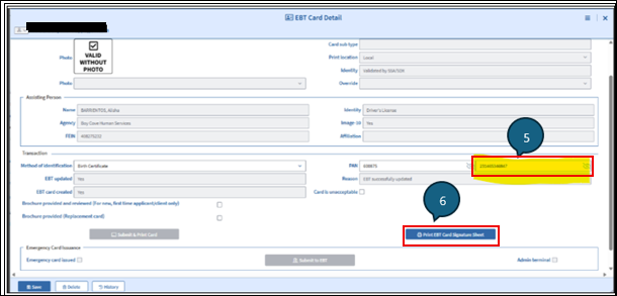
Figure 16: Screenshot of EBT Card Detail window showing steps 5 and 6 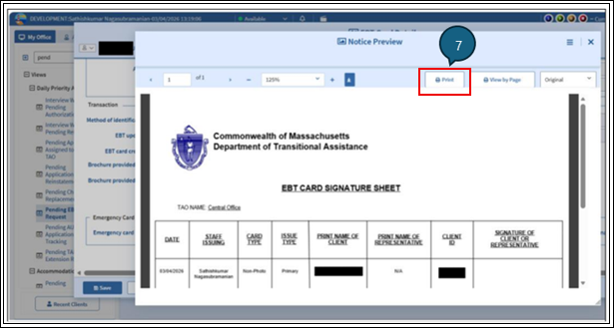
Figure 17: Screenshot of Notice Preview window showing step 7 - After printing, click Submit & Print Card. This will open the EBT Card Issuance window.
- Verify that the pan on the EBT Card Issuance window matches. View/HideView/Hide
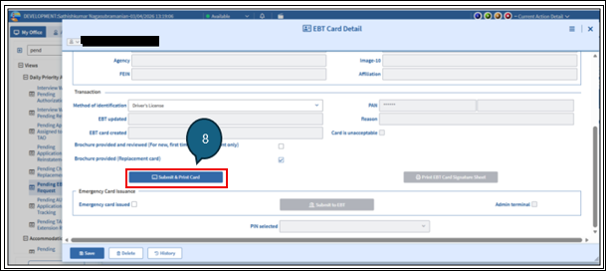
Figure 18: Screenshot of EBT Card Detail window showing step 8 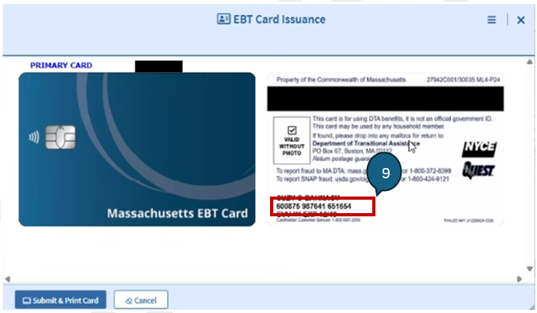
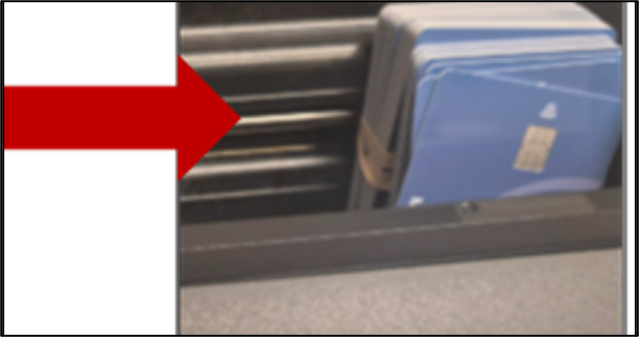
Figure 19: Screenshot of EBT Card Issuance window showing step 9 - Once PAN is verified you will need to put the card into the far-left side of the card hopper, you will want the chip and tap symbol facing up, and “Massachusetts EBT” along the bottom facing the hopper (as seen below). View/HideView/Hide
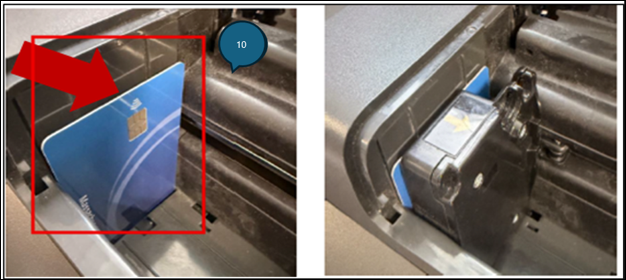
Figure 20: Image of step 10 showing how to properly insert card into printer - Once loaded you will click “Submit and Print Card” on the EBT Card Issuance Screen. If the PAN does not match what is shown on screen, click cancel and then re-swipe the card View/HideView/Hide
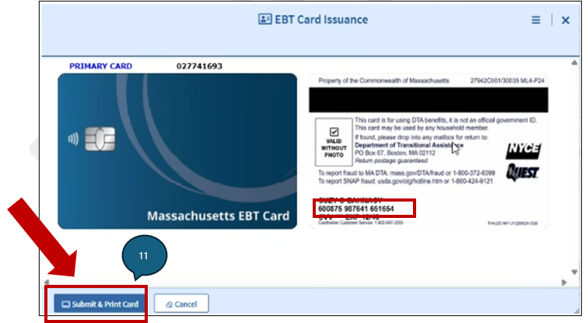
Figure 21: Screenshot of EBT Card Issuance window showing step 11 - Select a value from the “PIN selected” dropdown on the EBT Card Detail Window based on whether the client set a PIN in the office.
- Click Save to complete the process. View/HideView/Hide
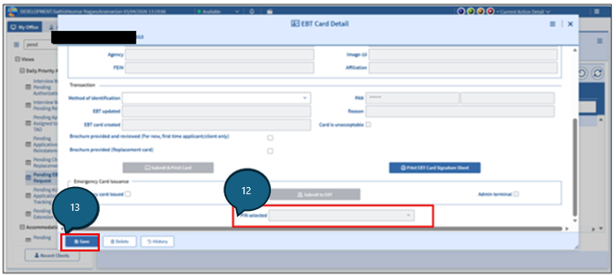
Figure 22: Screenshot of EBT Card Detail window showing steps 12 and 13 - BEACON will prompt “Was an acceptable card printed”, you must review the card and all details before you click yes.
- If everything is correct; click yes.
- If anything is not correct; click no and repeat issuance steps. View/HideView/Hide
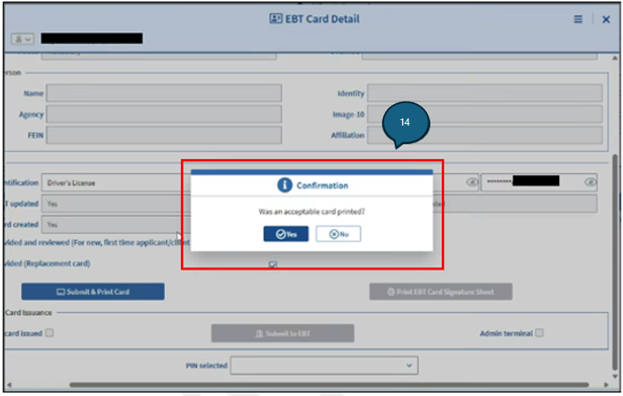
Figure 23: Screenshot of successful print Confirmation pop-up for step 14
- Once the card has been successfully printed, give the client the brochure and their card.
- File the Signature Sheet in a secure location assigned by TAO management.
Reminders:
Cards will be fed one at a time through the hopper on the left-hand side.
Always verify that the PAN in Beacon matches the PAN on the card before printing.
If a printing error occurs, follow existing procedures for voided or damaged cards.
If an acceptable card is not printed, you must use a new card when repeating the process (the first card would be voided).
You can now opt to tap the card when pinning for clients. If you do not wish to tap, you can insert the card as swiping will cause an error on the POS device.
When a Digital Signature Cannot be Captured
There will be situations when a digital signature cannot be captured despite having digital signature pad on hand. Reasons include:
- Technical Issue: if there is a system or technical issue preventing the digital signature from being captured,
- Client refusal due to:
- Security concerns: fear of data breeches, phishing and skimming, limited knowledge or trust in technology.
- Privacy concerns: fear of how the data is being stored, who it is being shared with, and what it can be used for.
- Accessibility concerns: clients with disabilities might face challenges with providing a digital signature, additionally, some clients with language barriers or limited experience with digital technology may not understand the process.
- Client preference: Some clients may simply prefer to provide a written signature.
When there is a technical issue or the client refuses to provide a digital signature staff must:
Prior to printing EBT cards, each day staff must place the daily card inventory in the hopper on the right-hand side for storage purposes only. Card Inventory should remain in the hopper throughout the day. View/HideView/Hide
Once a client has had an EBT card requested and they have been re-registered for Reason “EBT,” the front-end staff will meet with the client and issue an EBT card. To do this:
- Open the EBT Card Detail window.
- To do this navigate in BEACON to My Office → Views → Daily Priority Actions → Pending EBT Card Request and open the EBT Card Detail window
- Alternatively, you can go to Client Search in the My Office menu and search for the client directly. You can then click the EBT Card Details icon there.
- Once the EBT Card Detail window is opened select the Method of Identification.
- Select the appropriate Brochure option (New/Replacement). View/HideView/Hide
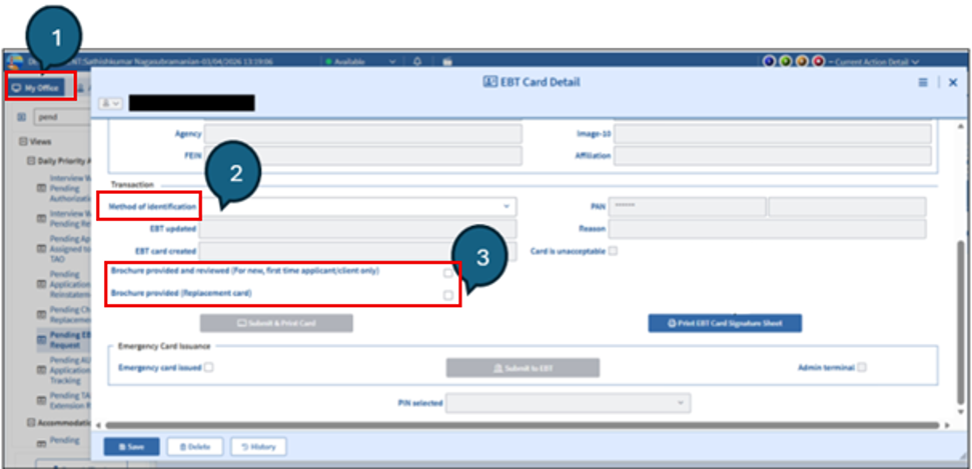
Figure 25: Screenshot of EBT Card Detail window showing steps 1-3 - Click on the empty space next to PAN shown below. View/HideView/Hide
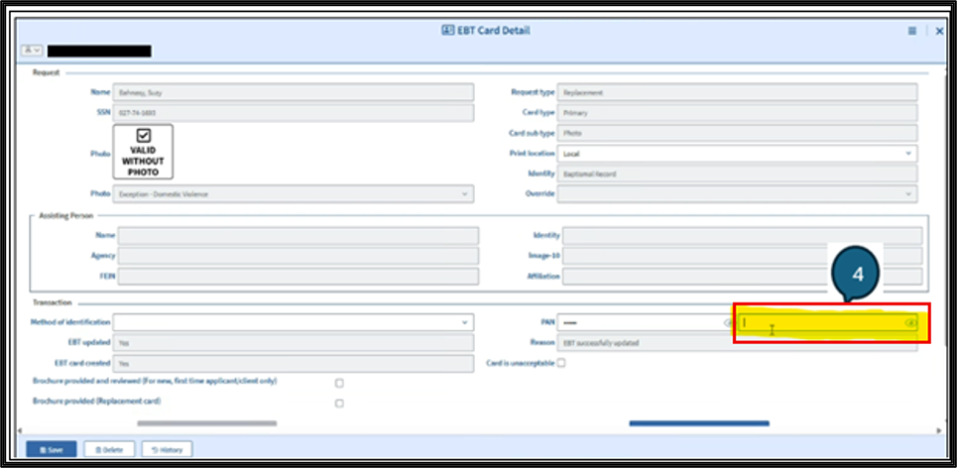
Figure 26: Screenshot of EBT Card Detail window showing step 4 - Take one card from the hopper and swipe the magstripe on the Magtek card reader provided. The PAN will populate in the highlighted field. Once done, the PAN will be masked, and you will verify the PAN on another step. View/HideView/Hide
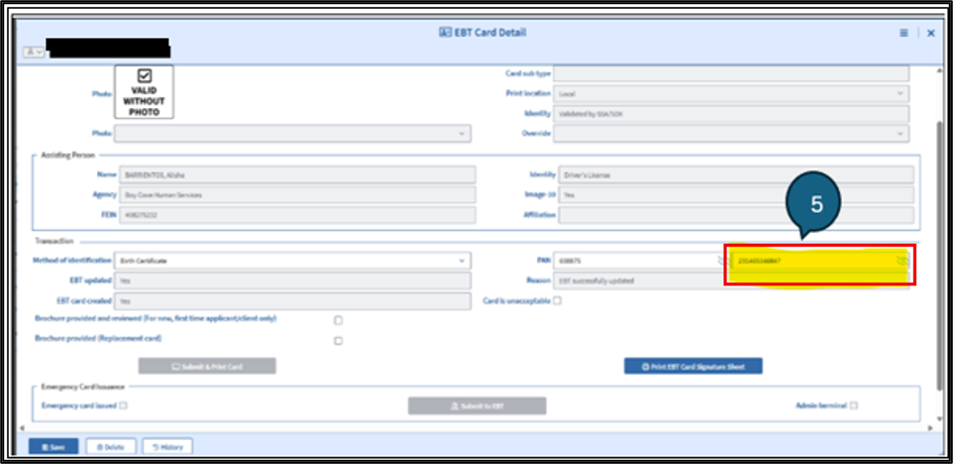
Figure 27: Screenshot of EBT Card Detail window showing step 5
- Click the Digital Signature button. View/HideView/Hide
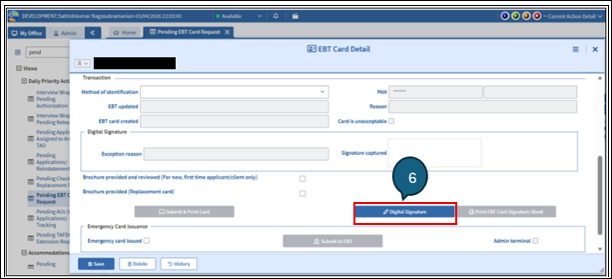
Figure 28: Screenshot of EBT Card Detail window showing step 6 - When prompted, select the exception reason Client Refused or Technical Issue,
- Click Save. View/HideView/Hide
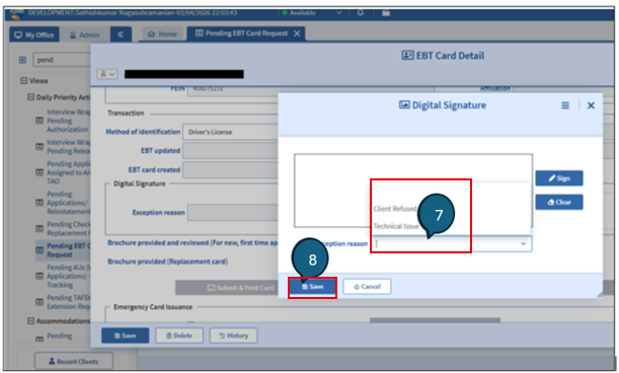
Figure 29: Screenshot of Digital Signature window showing steps 7 and 8 - The Print EBT Card Signature Sheet button becomes enabled. Click Print EBT Card Signature Sheet,
- print the EBT Card Signature Sheet from the Preview window, and have the client sign it. View/HideView/Hide
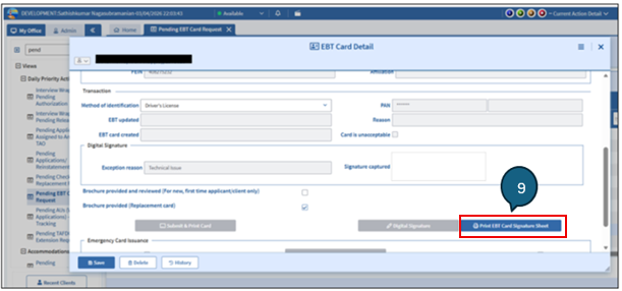
Figure 30: Screenshot of EBT Card Detail window showing step 9 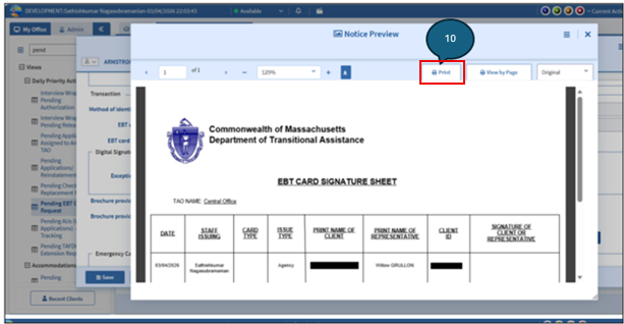
Figure 31: Screenshot of EBT Card Detail window showing step 10 - After printing, click Submit & Print Card. This will open the EBT Card Issuance window.
- Verify that the pan on the EBT Card Issuance window matches. View/HideView/Hide
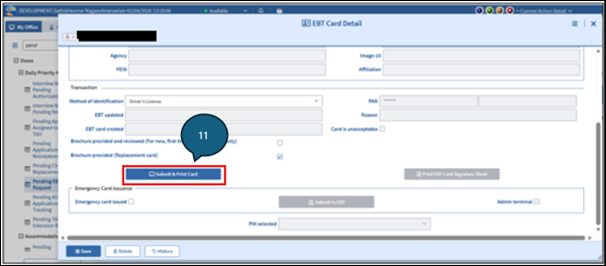
Figure 32: Screenshot of EBT Card Detail window showing step 11 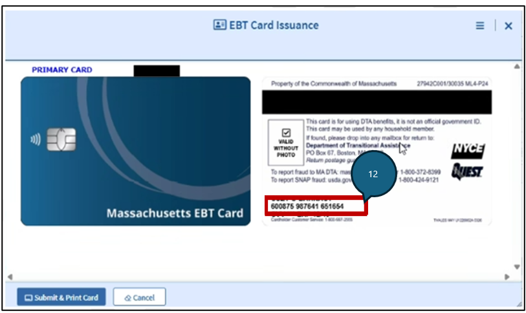
Figure 33: Screenshot of EBT Card Issuance window showing step 12 - Once PAN is verified you will need to put the card into the far-left side of the card hopper, you will want the chip and tap symbol facing up, and “Massachusetts EBT” along the bottom facing the hopper (as seen below). View/HideView/Hide
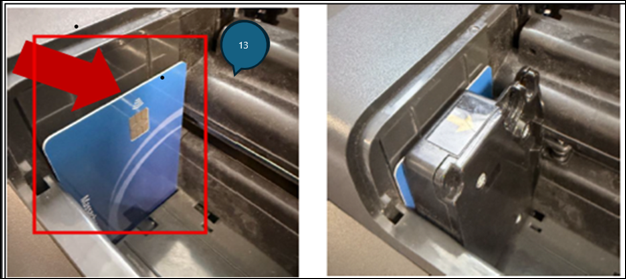
Figure 34: Image of step 13 showing how to properly insert card into printer - Once loaded you will click “Submit and Print Card” on the EBT Card Issuance Screen. If the PAN does not match what is shown on screen, click cancel and then re-swipe the card View/HideView/Hide
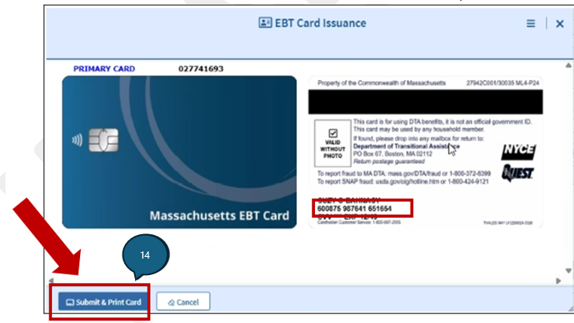
Figure 35: Screenshot of EBT Card Issuance window showing step 14 - Select a value from the “PIN selected” dropdown on the EBT Card Detail Window based on whether the client set a PIN in the office.
- Click Save to complete the process. View/HideView/Hide
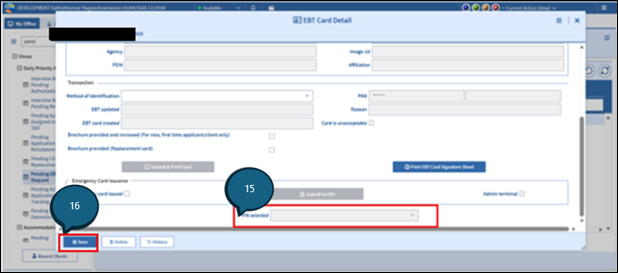
Figure 36: Screenshot of EBT Card Detail window showing steps 15 and 16 - BEACON will prompt “Was an acceptable card printed”, you must review the card and all details before you click yes.
- If everything is correct; click yes.
- If anything is not correct; click no and repeat issuance steps View/HideView/Hide
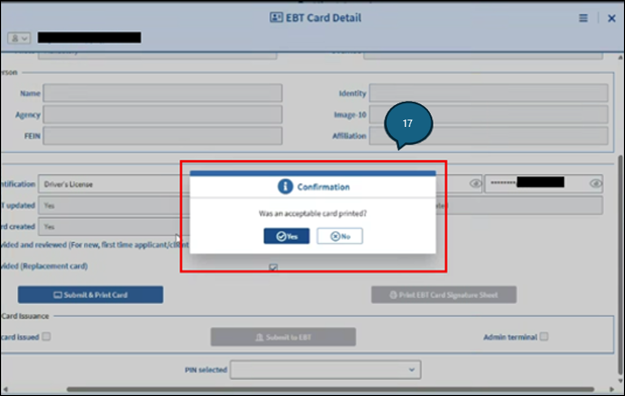
Figure 37: Screenshot of successful print Confirmation pop-up for step 17
- Once the card has been successfully printed, give the client the brochure and their card.
- File the Signature Sheet in a secure location assigned by TAO management.
Reminders:
Cards will be fed one at a time through the hopper on the left-hand side.
Always verify that the PAN in Beacon matches the PAN on the card before printing.
If a printing error occurs, follow existing procedures for voided or damaged cards.
If an acceptable card is not printed, you must use a new card when repeating the process (the first card would be voided).
You can now opt to tap the card when pinning for clients. If you do not wish to tap, you can insert the card as swiping will cause an error on the POS device.
For Emergency EBT Cards
If an EBT card is needed but the card issuance system is inoperable, an emergency EBT card can be issued. For cards issued with Sub Type “Emergency,” an authorized user is required to approve and issue. This is coded into BEACON.
Card issuers will follow the steps above through step 7 or having the client provide their signature. Then:
- check “Emergency card issued” on the EBT Card Detail window,
- enter the pre-numbered PAN from the Emergency Card,
- click “Submit to EBT” to electronically transmit the Emergency PAN to the ebtEDGE system,
- have the client select a PIN, and
- give the client the pre-numbered Emergency Card.
If BEACON is unable to electronically transmit the Emergency Card PAN that was manually entered by the card issuer to the ebtEDGE system, the issuer must:
- enter the client data and PAN onto the ebtEDGE system by using the administrative terminal,
- select the Admin Terminal checkbox on the EBT Card Detail window,
- have the client select a PIN, and
- give the client the pre-numbered Emergency Card.
See: Desk Guide – Issuing EBT Cards
See: Printing EMV Cards Job Aid
Related Topics
Electronic Benefit Transfer - Policy and Procedures
Overview – Electronic Benefit Transfer (EBT)
Last Update: July 24, 2026
|
|
|
||
| Digital Accessibility Statement | Privacy Policy | Site Policies | Public Records Requests |
|
© 2026 Commonwealth of Massachusetts. Mass.gov is a registered service mark of the Commonwealth of Massachusetts. |
|||