An official website of the Commonwealth of Massachusetts Here's how you knowHere's how you know

Entering Health Insurance Data in BEACON
Overview
The Health Insurance page captures information about any basic health insurance coverage and benefits a household member has. The Health Insurance page is usually enabled so that new health insurance information can be entered at any time. This page is marked for reedit any time a SNAP RFA includes someone who is at least age 60 and/or federally disabled.
The health insurance page has two tabs:
- Health Insurance Policy tab
- Health Insurance Benefits tab
Health Insurance Policy Tab
Use this tab to collect insurer details, policy details, and subscriber data.
Add Insurer and Subscriber Data on the Policy Tab
Note: If the insurer is Federal Government, the benefit type selections are Medicare A and Medicare B. If the insurer is Medicare Supplement (Medigap), then MEDEX Sapphire, Core, Choice, and Bronze are selectable as benefit types.
- access the Health Insurance page. The Policy tab is selected by default. View/HideView/Hide
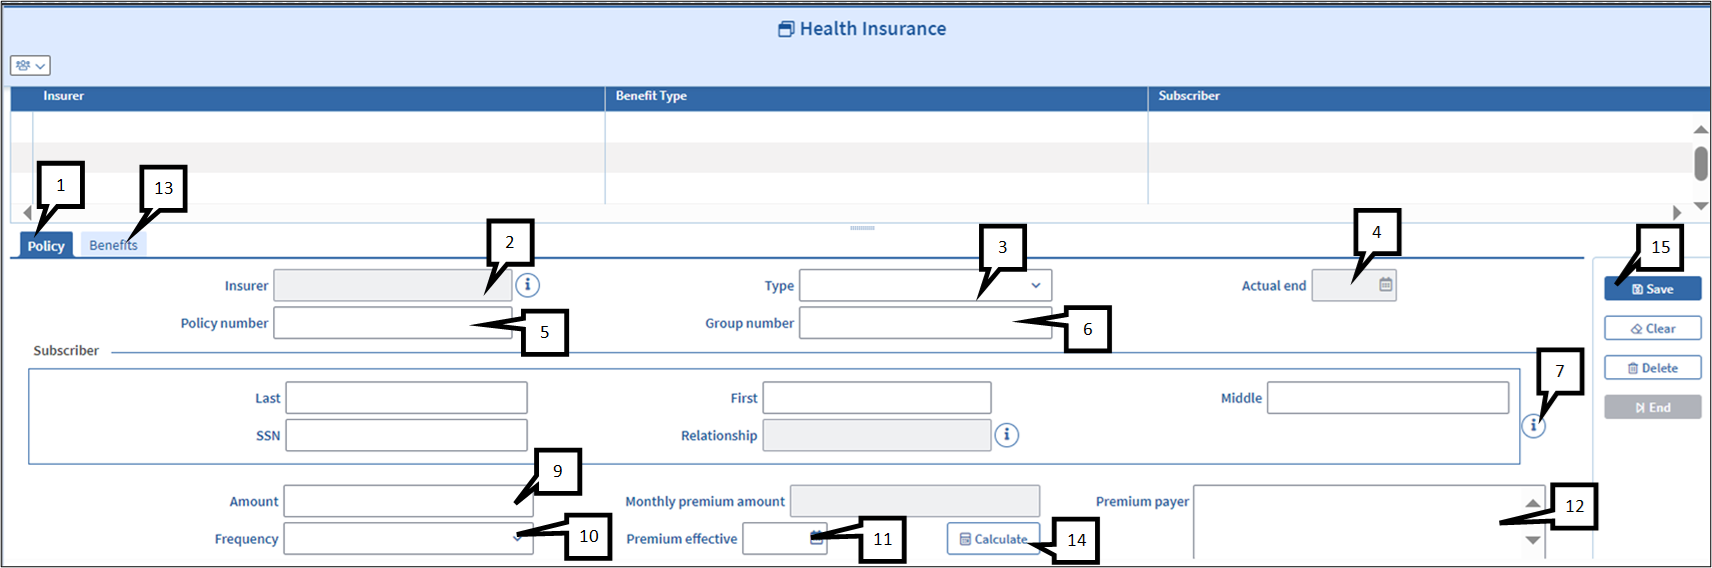
- click the Insurer Pop-up icon. The pop-up displays a list of insurers. Select an insurer from the dropdown list. The selected Insurer will appear in the Insurer field.
- select the appropriate type of health insurance
- the Actual End field is not enabled when entering Health Insurance data
- enter the health insurance policy number (optional)
- enter the health insurance policy group number (optional)
- click on the pop-up button next to the middle name field to open the Household Member/Basic Person list page. This page lists all the members of the household. Select the member who is the subscriber for the insurance policy.
-
Note: The first, last, middle names and the Social Security number of this person will display as a default in the subscriber field of the policy tab. The relationship of this person also defaults to whatever was previously selected on the Relationship page. If the person you selected is the subscriber, Self will display in the Relationship field
-
- if the subscriber is not displayed in the Household Member/Basic person list, enter the person’s SSN, first, last and middle names in the appropriate fields, then select the relationship of the person to the client from the drop-down list relationship popup icon
- enter the monthly premium/policy amount for the health insurance in the Amount field
- enter the frequency of the payment (e.g., monthly, quarterly, etc.) in Frequency field
-
Note: You will need to add a decimal point when entering expenses that are not a whole dollar amount. ExampleExample
-
- Type in the premium effective date or select the date from the pop-up calendar
- click Select and select one or more appropriate premium payers from the drop-down multi select-list
- click on the Benefits tab to complete the benefit field (see instructions below for Complete the Benefits Tab)
- click on the Policy tab and click Calculate. The dollar figure entered for Amount will be used to calculate the figure in the Monthly premium amount field.
- click Save to save the record to the selection list
- click Next to go to the next page in the workflow, or click Finish to save and exit the page and workflow
Complete the Benefits Tab
Use this tab to collect benefit data for an insurer.
Note: If you change the insurer, BEACON removes all the benefits from the benefits page for that record
Add Insurance Benefits on the Benefits Tab
Once the appropriate information has been added to the Policy tab: View/HideView/Hide
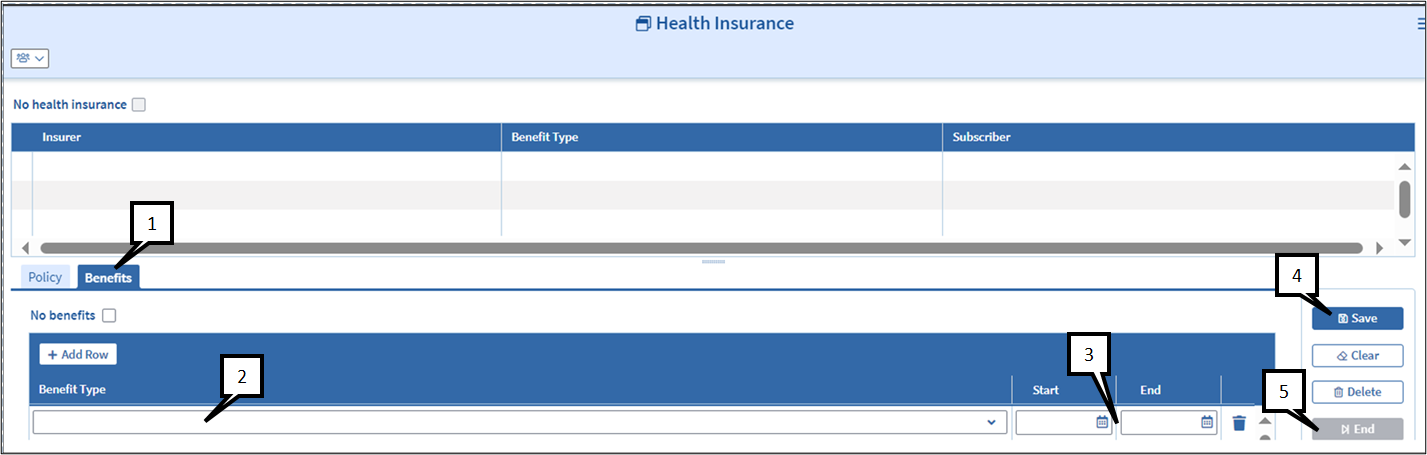
- click the Benefits tab
- for Benefit Type, select a type of benefit from the dropdown list
- for Start and End, enter the start and end dates, as appropriate. You can select dates from the pop-up calendar or type in the dates.
- to save the record to the select list, click Save
- to enter information for a new benefit tab, click Clear and Repeat steps 3-5. To delete a row, click the Delete-a-Row icon next to it
- Click Next to save and go to the next page, or click Finish to save exit the page and workflow
Important: BENDEX will batch in the gross amount of RSDI. Like all other health insurance entries, self-paid Medicare Part B will be deducted from the gross RSDI. The client will be allowed the standard medical deduction, or an actual medical deduction based on the total monthly medical expenses on file.
Identify Clients Enrolled in MEDEX
When processing applications and recertifications, it is important to properly code clients enrolled in MEDEX. Proper coding ensures that the household receives the correct benefit amount and that the MEDEX amount will be properly updated automatically each year.
To Enter MEDEX Premium Payments
- click the Policy tab and for Insurer select Medicare Supplement (Medigap)
- access the Benefits tab and select the correct Benefit Type from the drop down list
- click Save to save the record to the select list
Update a Health Insurance Record
- select the appropriate household member from the members list and select record to be updated from the select list
- update the fields, following the pertinent steps of the Add Insurer and Subscriber Data on Policy Tab section of this page, and those of the Add Insurance Benefits on the Benefits Tab section.
End or Delete a Health Insurance Record
- To delete, select the household member from the members list, select the record to be deleted, and click Delete
-
Important: Only records that have not been saved or used in a calculation can be deleted. If the record has been saved or used in a calculation you must end the record.
-
- To end, select the record to be end dated and click End
- Important: When End is selected, a confirmation box displays. You can set a new end date by clicking the calendar icon and selecting a date or you may enter the date manually. If you wish to cancel out the end date procedure, click Cancel. To view an end dated record click the History icon:

- Important: When End is selected, a confirmation box displays. You can set a new end date by clicking the calendar icon and selecting a date or you may enter the date manually. If you wish to cancel out the end date procedure, click Cancel. To view an end dated record click the History icon:
- click Ok to confirm the end date
- click Save to save the end dated record to BEACON
- click Next to save and go to the next page in the workflow or click Finish to save and to exit the page and the workflow
Last Update: March 8, 2024
|
|
|
||
| Digital Accessibility Statement | Privacy Policy | Site Policies | Public Records Requests |
|
© 2026 Commonwealth of Massachusetts. Mass.gov is a registered service mark of the Commonwealth of Massachusetts. |
|||