Entering Dependent Care Expenses Data - SNAP
Overview
The Dependent Expenses Page captures information regarding the client’s dependent care expenses.
This page must be completed any time a client indicates that they have dependent case expenses.
During case maintenance, clients can update their dependent care expenses by submitting documentary evidence or by self-declaring their mileage, either telephonically or in writing.
BEACON will use this information to calculate the Dependent Care Expense Deduction for each dependent that can be used as a deduction for the household member incurring the expense.
Note: If there are no dependent care expenses, check the No Dependent Care Expense checkbox located on the Dependent Care Expense page. If expenses are entered and saved, this box will become unchecked automatically. View/HideView/Hide

The Dependent Care Expense page contains two tabs:
- Expense
- Prospective
Expense Tab
The Expense tab is used to capture information regarding Dependent Care Expenses for a household member who has a responsibility of paying the expense, in at least one household within the current eligibility group.
Warning: If the dependent care expense is to be used in the calculation of eligibility and benefit amount as a prospective expense, the Prospective Expense tab must be completed, or the expenses will not be used in the EBC process.
Add a Dependent Care Expense to the Expense Tab
- access the Dependent Care Expense page. The Expense tab is selected by default
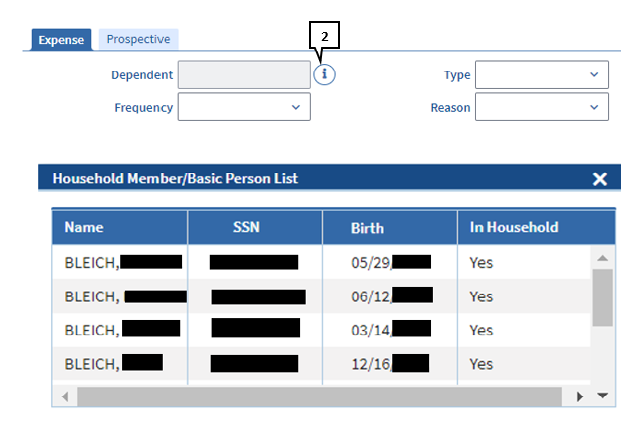
- click on the Dependent pop-up icon. A Household Member/Basic Person list, which contains all non-grantee members of the household, will display. Select the dependent for whom the expense is incurred from this list and the dependent’s name will display in the dependent field View/HideView/Hide
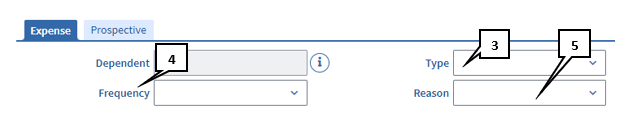
- for Type, select the appropriate type of dependent care from the dropdown list
- for Frequency, select the appropriate frequency of the expense payment from the dropdown list
- for Reason, select the appropriate reason for the expense from the dropdown list View/HideView/Hide
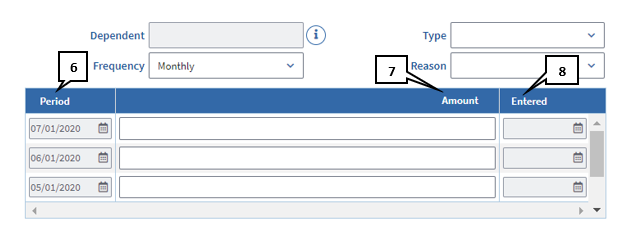
- Period is a view only field that defaults to the frequency of payment period you selected in frequency field.
-
Warning: If you change information in the frequency field and click Save, the Period list rebuilds and all existing selections/entries in the list are removed. You must then reenter the expense amounts in the expense amount field.
-
- for Expense Amount, enter the dollar amount of the expense for the selected dependent
-
Note: BEACON adds a decimal point only for whole dollar amounts (if $40 is entered, BEACON adds the decimal point and it will show as $40.00). You will need to add a decimal point when entering expenses that are not a whole dollar amount. ExampleExample
-
- for Entered, the system defaults to the date the expense information was entered or the last date it was changed View/HideView/Hide
- for Subsidized, select Yes if part of the expense is paid by a voucher and No if the client is responsible to pay the full amount. This is an optional field.
- for Allowable Cash, select Yes if the expense is an allowable deduction for cash, otherwise select No
- for Allowable FS, select Yes if the expense is an allowable deduction for SNAP, otherwise select No
- click Save, to save the information
-
Note: When saving the record, a BEACON prompt will state that a prospective calculation is required. If you select Yes, you will be able to create a prospective expense. If you select no you will be able to exit the page without creating a prospective amount, and continue with the workflow but the page will be set to re-edit (a pencil icon will appear).
-
- you may start entering information for a new record immediately after saving the prior record by pressing the clear button and following steps 2-14 to add more expenses for other members
- Note: Remember it is important, for demographic purposes, that you enter the expenses for each member for whom the expense is incurred.
- click Next to save and go to the next page, or click Finish to exit the page and the workflow
- to continue entering dependent care information see the Prospective Tab
-
Note: Remember it is important, for demographic purposes, that you enter the expenses for each member for whom the expense is incurred
-
Prospective Tab
This tab is used to calculate the Monthly Prospective Expense Amount for a particular dependent care expense type.
Calculate the Dependent Care Expense Using the Prospective Tab
- click on the Prospective tab or answer ok to the soft edit pop-up ”Please calculate the prospective amount”
-
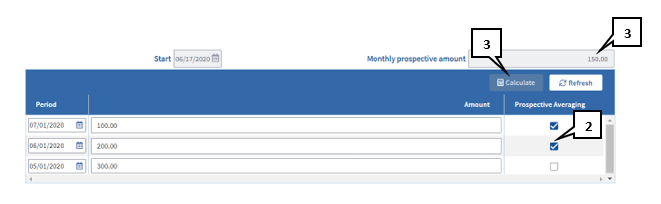
Note: The Start date for the prospective amount is defaulted to the current date and cannot be changed.
-
- select one or more expense amount records to be used in the calculation of the monthly prospective amount by checking the Prospective Averaging checkbox next to the record(s)
- click Calculate. The calculated amount will display in the Monthly Prospective Amount field View/HideView/Hide
-
Note: If you selected the wrong amount in an existing monthly prospective amount, click on the refresh button and revisit step 2.
-
- to begin entering information for a new record, click the Clear button and follow steps 2-14 of Add a Dependent Care Expense to the Expense Tab
- click Next to save and go to the next page, or click Finish to exit the page and the workflow
Update a Dependent Care Expense Record
- select the expense record to be updated from the select list
- update the fields, following steps 2 – 14 of Add a Dependent Care Expense to the Expense Tab
Important: Dependent Expense Care records require a new Monthly Prospective Amount to be calculated every time they are updated.
End or Delete a Dependent Care Expense Record
- To Delete, select the record to be deleted from the select list and click Delete
-
Important: Only records that have not been saved or used in a calculation can be deleted. If the record has been saved or used in a calculation you must end the record.
-
- to End, select the record to be end dated from the select list and click End
-
Important: When End is selected, a confirmation box displays. You can set a new end date by clicking the calendar icon and selecting a date or you may accept the default date. Verify the date is correct. If not, change the date.
-
- If you wish to cancel the end date procedure, click Cancel. To view an end dated record click the History icon.
- click ok to confirm the end date
- click save to save the end dated record to BEACON
- click Next to save and go to the next page in the workflow or click Finish to save and to exit the page and the workflow
Last Update: May 21, 2026