An official website of the Commonwealth of Massachusetts Here's how you knowHere's how you know

Troubleshooting SSN Mismatches
The verification of Social Security Numbers (SSN) is a critical, mandatory requirement for all applicants seeking eligibility for DTA assistance programs. The Department verifies all SSNs for all clients and their household members by computer match with SSA. The State Verification and Exchange System (SVES) is an automated matching process that runs nightly to verify SSN and SSA benefits. Only once a SVES inquiry returns a verified status, indicated by a “V” in the Verification Code field, can an AU member be approved for ongoing benefits.
When SVES returns a code other than “V”, additional steps must be taken to determine the nature of the mismatch to correct the situation and update the case accordingly.
For more information, see Entering a Social Security Number and How to Read a Social Security Card.
SVES Verification Codes
| Verification Code | Code Meaning | Actions to Take |
|---|---|---|
| V | Verified | Mark SSN as Verified |
| X | Verified and Deceased | Mark SSN as Verified. Remove HH member from the case for reason Death. |
| 1 | SSN Not Found | Do not approve for ongoing benefits. Investigate unmatched information. Potential Fraud |
| 3 | Surname Matched, DOB Not Matched | Do not approve for ongoing benefits. Investigate unmatched information. |
| 5 | Surname or Given Name Not Matched | Do not approve for ongoing benefits. Investigate unmatched information. |
| F | Verified Surname Does Not Match | Do not approve for ongoing benefits. Investigate unmatched information. |
| * | SSN Does Not Match | Do not approve for ongoing benefits. Investigate unmatched information. |
| & | Multiple Verified SSNs | SSA Error – does not affect FAWs or case managers, but may affect FORS |
Common Mismatches and Solutions
The most common reasons for SSN mismatches are data entry errors. If a mismatch code of 1, 3, 5, F, or * appears in the SVES results, first review the case to make sure that Name, Date of Birth, Gender, and SSN information is correct. Compare this information to primary source documents, especially those provided by SSA. To check for data entry errors:
- Review the Scanned Document History for primary source documents, such as Social Security Cards, Birth Certificates, letters from SSA, marriage certificates, or other useful identifying documents. Compare the identifying information with what is entered in the Assessed Person page in the ECF.
- Review the History of the Assessed Person page and note any changes that have been made to Name, Date of Birth, Gender, and SSN. Compare with any narratives entered around that time period to find the context or reasons for the changes.
- Check the Household page to see if there are duplicate entries for household members. These could be related to a previous SSN mismatch.
- Review the narrative for any clues left by previous workers that might indicate a known issue related to the SSN mismatch.
- Review Match History, such as Identity Matches, SSN Verification Matches, Unearned Income Matches, and Earned Income Matches.
Some common data entry errors come from:
- Simple transcription errors from reading written SSNs or names from applications or self-declarations.
- Client-entered SSN errors, such as:
- For grantees, sometimes clients will apply for benefits when they are already active and so receive an error when their SSN matches to an existing case; oftentimes they will provide a slightly different SSN as a workaround.
- For other household members, sometimes applicants do not know the person’s SSN or misremember them.
- Misspelled names or given names not matching the name SSA has on file for the client or household member.
- Sometimes this is due to marriage, divorce, or a legal name change.
- SSA is very particular about names, and sometimes this is not obvious to the client or case manager.
- The client may have two first names; the Social Security card groups given and middle names on the top line, but does not distinguish between the two. Check other legal documents, or if they are not available, consider using the first two names on the card for the given name to try to find a match.
- Documentation of the legal name change is NOT required but can help determine the proper name. Documentation from SSA is the best way to resolve this.
- “FNU” is a common government-issued given name placeholder used for noncitizens arriving without a clear legal given name. “FNU” means “First Name Unknown” and this will appear on the SS card on the top line.
- Gender mismatches, due to data entry error, birth certificate error, SSA data error, or a legal change in gender designation.
- This information is not available on SS cards. Documentation from SSA may provide this information, or a statement from the client.
- Documentation of a change in gender designation is not required to determine proper gender. A match through SVES will verify this.
- Sometimes, a client will present and identify as one gender, but is recognized as another with SSA due to not legally changing or updating the designation. Practice sensitivity to the client’s preferences, but use the gender known to SSA to verify SSN.
- Date of Birth errors, where the incorrect date of birth is entered in the application.
- BEACON follows the standard date and time notation of the United States, listing dates of birth in the month-day-year order (e.g., 1/8/1912 for January 8th, 1912).
- Most other countries follow the ISO 8601 format which is day-month-year (e.g., 8/1/1912 for January 8th, 1912). Documentation provided from other countries, such as passports, will often use this ISO 8601 format.
- If there is uncertainty in which format is being used, look for a written-out month, compare with other documentation, experiment with different formats, or ask the client directly.
Trial-and-Error Verification with a Special SVES Request
Many times, these errors can be resolved using information already available in the case folder and verified using a Special SVES Request. This type of SVES request allows you to input data that is different from what appears in the case file to look for an SSN match. Only one Special SVES Request can be made per day, so be careful to experiment intentionally, changing one piece of information at a time.
To initiate a Special SVES Request, in the client’s ECF, click on the Tools tab and click on the right-arrow button to show more icons. Click on the orange circle button that says Special SVES. View/HideView/Hide
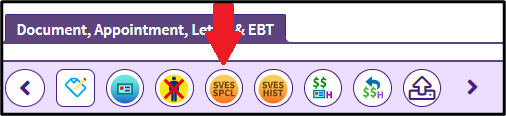
This will open up a popup box with the client’s information. Using the information you’ve gathered from troubleshooting, above, modify one piece of demographic information with your best-informed guess and submit the Special SVES Request. These are processed along the same timelines as regular SVES requests. Follow-up the next business day to view the results; if there is still not a match, try other possible alternatives.
Reaching Out to the Client
If there is not enough information available to make a better guess, contact the client to clarify. Oftentimes, an updated SS card or official SSA documentation showing how SSA has listed their name and/or date of birth is enough to get the correct information. If you are unable to reach the client after two cold calls, issue a VC-1 for “Clarification of Social Security Number” for the household member(s), which will ask them to send in a copy of the Social Security Card or documentation from SSA. Do not create a user-generated VC-1 for this item.
Related Topics
Last Update: May 5, 2026
|
|
|
||
| Digital Accessibility Statement | Privacy Policy | Site Policies | Public Records Requests |
|
© 2026 Commonwealth of Massachusetts. Mass.gov is a registered service mark of the Commonwealth of Massachusetts. |
|||